Rafting is a lot of fun, and whether you are with family, friends, or alone, it can make your time worthwhile. There are a variety of rafts, ranging in their capacity, from casual rafting to more adventurous classes of white water rafting. You can get anything from the stores it seems. But, have you ever wanted to let your inner adventurer out, and do it a little differently.
Building a raft can be an adventure in a way. All you need is a couple of tools, the material for making a stable and safe raft, and the sense of adventure inside of you. With all this, you’ll have your handmade raft in no time.
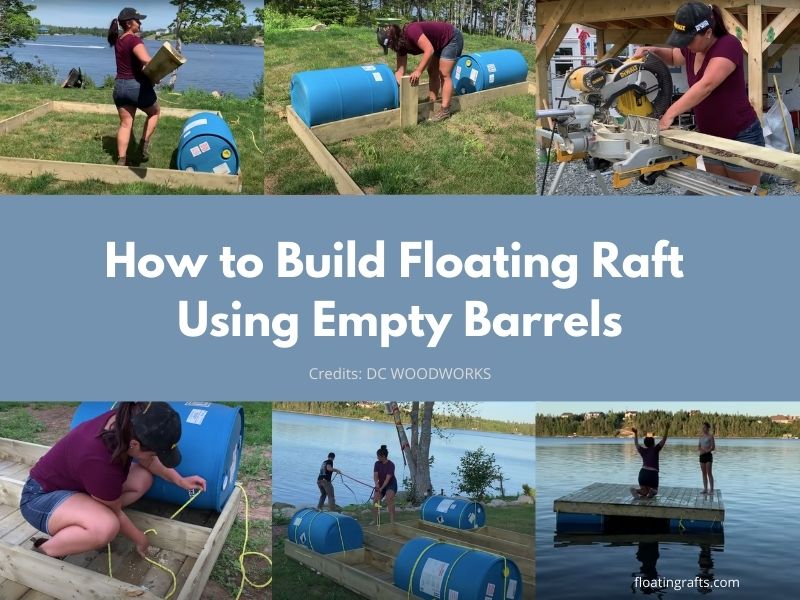
In this article, we’ll discuss how you can turn empty barrels into a float you can take out on the waters. Follow the instructions carefully, and you’ll be floating on water like an expert in no time. So, let’s end the preamble here and get into the method.
Step-by-step Guide to Building the Floating Raft (Using Barrels)
1. Gather everything you’ll need!
First and foremost, you’ll need to gather everything that you’ll need for building your barrel float. You’ll be needing the following tools and materials.
Tools Needed
- You’ll need an essential power tool for your project, a drill. You can use a battery-operated unit for ease of handling. If you’re working with a corded model, you can use an extension cord. If you’re making the float near the water body (for ease of portability), a battery-operated cordless drill makes more sense.
- To accompany your drill, you’ll be needing a variety of drill bits for more precision.
- Along with this, you’ll also need Square, a hammer, A Skilsaw, and a measuring tape.
- To seal the barrels to stop the water from entering, you’ll need Teflon or plumber’s tape. You can also use silicone to close the barrels.
Materials Needed
- For this project, you’ll need six pieces of 2/8/10 feet pieces and one 2/8/12 feet piece. Later on, you’ll cut the pieces for ribbing purposes, to support the deck of your raft.
- For the flooring of the raft, you’ll need around sixteen 1/6 inches, pressure-treated pieces of lumber.
- For this particular project, you’ll need four barrels that are 23 inches in diameter and 35 inches long. Depending on the place you’re getting your barrels from, the size of the barrels can differ. You’ll need to make slight changes in the overall structure accordingly.
With all this in your sight, you can begin working on your floating raft.
2. Constructing the Frame
Firstly, you’ll be building the frame of the raft, which is going to be 8/8 inches long. For this, you’ll need end pieces that have the size of full 8 feet, or 96 inches. Ribs for the frame, on the other hand, will need to be 93 inches long. This difference is there to accommodate the width of the end board. Don’t follow? Let’s elaborate.
The end boards are one and a half inches in size, which means that the 2/8 lumber isn’t a full 2 inches wide. One and a half inches twice make three inches in total, and that’s why the ribs need to be 93 inches to accommodate the end boards.
Working the Barrels
As we mentioned earlier, we’ll be going with barrels that are 3 inches in diameter and 35 inches in length. You’ll need four of these barrels for this structure. To make sure that the barrels fit perfectly into their place inside the frame, you’ll need openings at the side of these barrels. These will be of 21 and a half inches/35 inches in length. Doing this will ensure that your barrels stay in their place to keep the structure stable.
Cross- braces
For cross bracing, we’ll need the extra two feet from the eight-foot lengths. As we’ve mentioned earlier, we’re using six 2/8/100 foot and one 2/8/12-foot pieces for the project.
To make them stick, you’ll need about one and a half pounds of dex screws (about three and a half inches long).
3. Fastening the Barrels onto the frame
After you’ve finished the framework of your raft, you need to insert the barrels you have into position.
The opening you’ve made earlier will accept the barrels easily. Once the barrels are in place, the water will push up on the raft more firmly. To keep the barrels in place, you will need something to tie them to the frame. You can use the Nylon rope, which is very strong (it’s the same one that Fishermen use). Here’s how to tie it properly.
- First, run the rope through the 2/8 piece, and make a knot on the inside. Wrap it around the barrel, and from there to the other side. Run the rope through the 2/8, and finish off with a knot.
- In case the barrel is wobbly, they’ll be pushing down on the rope, making the knots even firmer. You don’t need to worry about imbalance once everything is in its proper place.
- You’ll need around 50 feet of 3/8 rope for fastening the barrels in place, and each of the barrels will need to be fit in place using two lengths of rope. You’ll need an additional rope for making a piece for the end, and if there’s any rope left from fastening the barrels, you can use that. Otherwise, you can use another cut. It is in place to tie the anchor. To set it, you can follow the same procedure as before.
4. Setting the Deck Flooring
After putting the barrels in place, the next thing to do is to set the flooring of your raft. For this, the ideal choice is 1/6 pressure treated lumber in eight-foot lengths. You can go with smoothed lumber, as not only is it aesthetically more appealing, it is also safer. It is ideal, especially if you have kids who’d like to come on board. Smoothed lumber ensures that no splinter harms their legs.
While you’re working on flooring, you can keep the following points in mind.
- Spanning the flooring across the ribs of the deck ensures increased overall strength of the structure.
- When you fix the deck lumber to the deck, the ideal option is two and a half inches of galvanized dex screws. You’ll need approximately two pounds of these to finish it all off.
Now, when you install these floorboards, they’re going to push down on the barrels. Thanks to the ropes already placed to hold them, the pressure from the boards is only going to tighten the boards, keeping them in their place. If any part of the raft seems uneven to you, you can push down to get the barrels to go back down and flatten the raft.
With this, the deck of your floating raft is complete. You can leave the raft as is, or you can play around with various additions such as a ladder and slide for your kids, as an addition to the raft.
Here’s what you’ll need to do to add a ladder and a slide for your kids on the raft.
Adding a Ladder and a slide onto the Slide
To do this, you’ll be needing the following things.
- You’ll need about three pressure treated 4/4/8 feet pieces.
- You’ll need a slide, which you can buy first hand (they can be a bit expensive, depending on their made) or, you can look for a used one on eBay or other online platforms, or at your nearest flea market.
Here’s what you’ll need to do.
- Among the three pieces of pressure treated 4/4/8 feet lumber, you can leave two of them at full eight feet long.
- Take the remaining 4/4 piece of wood, and cut it in half. It is going to be useful for the other corner.
- With the 4/4/8 pieces, you’ll need to place them upright. You’ll be making the outside of your ladder, which kids will use to climb up the Slide.
- With the other halves of wood, you’ll be making the front two stilts for the structure. On these two stilts will sit the platform on which the kids will stand before they go ahead and slide.
- Finally, you’ll attach the Slide in front of the platform. Make sure that it does not exceed the edge of the raft. The Slide will end approximately two feet above the water level.
And with that, your barrel raft, along with the ladder and Slide for your kids, is complete. Enjoy!
Conclusion
Floating on a raft can be a peaceful and relaxing activity, and it can be a storm of fun. It all depends on what you want with your day. Your floating raft, made with wood and a couple of empty barrels, can be for a fishing trip, or a sunbathing experience, for a family picnic, or the kid’s day out. Whatever you end up doing, you’re sure to have a lot of fun on this float.
We wish you good luck with the project, and afterward, lots of fun-filled holidays from your routine!